Georeferencing Chernarus and visiting in real life 🗺️
In this post I will walk through how to
- Obtain a high-resolution raster map by stitching map tiles from a tileserver with a shell script.
- Georeference a fictional map to a real location by manually matching features and their corresponding real locations using QGIS.
- Convert the georeferenced map to a Garmin compatible KMZ file with a Python script using GDAL for use on a handheld GPS device.
I will apply it to the fictional map of Chernarus which is based on a real area near Ústí nad Labem in Czechia. The end product is a georeferenced Garmin compatible KMZ file which you can put on your GPS handheld if you ever visit the area.
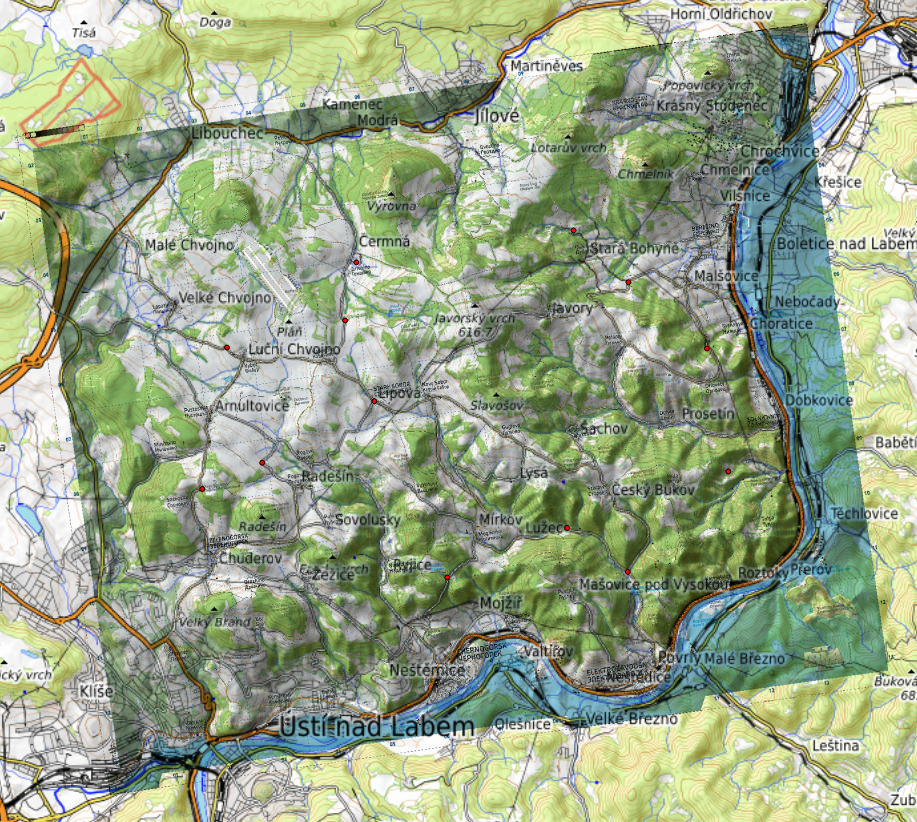
The map below shows Chernarus (left) overlayed with the real region (right) - you can move the map and drag the slider to compare:
Click here for a full screen version of the map.
Background
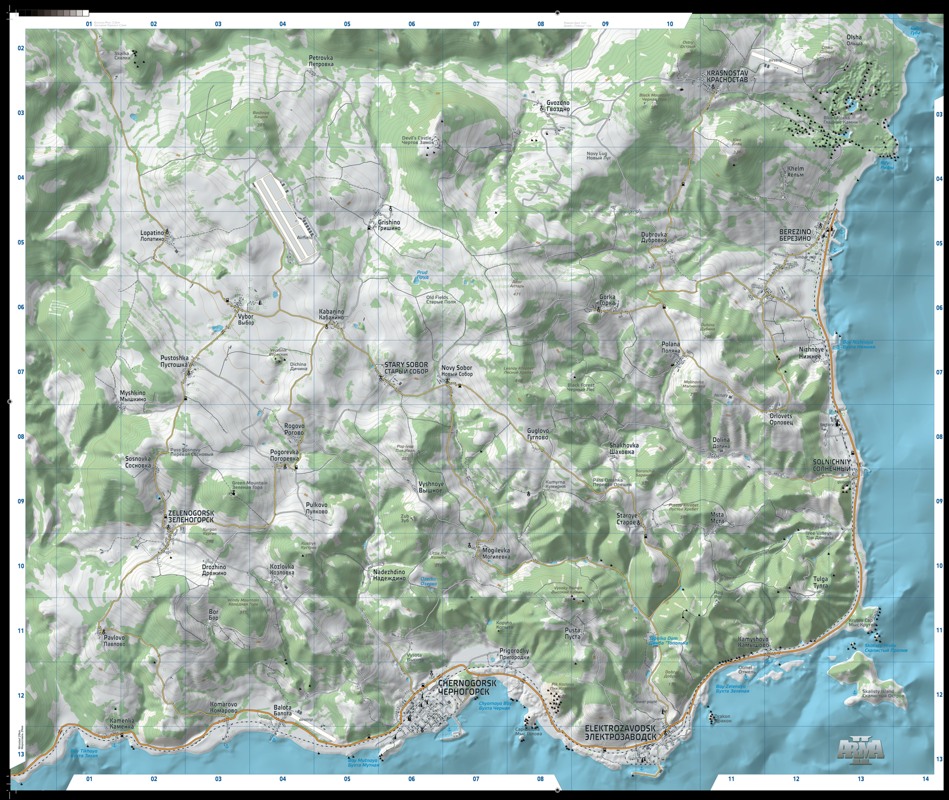
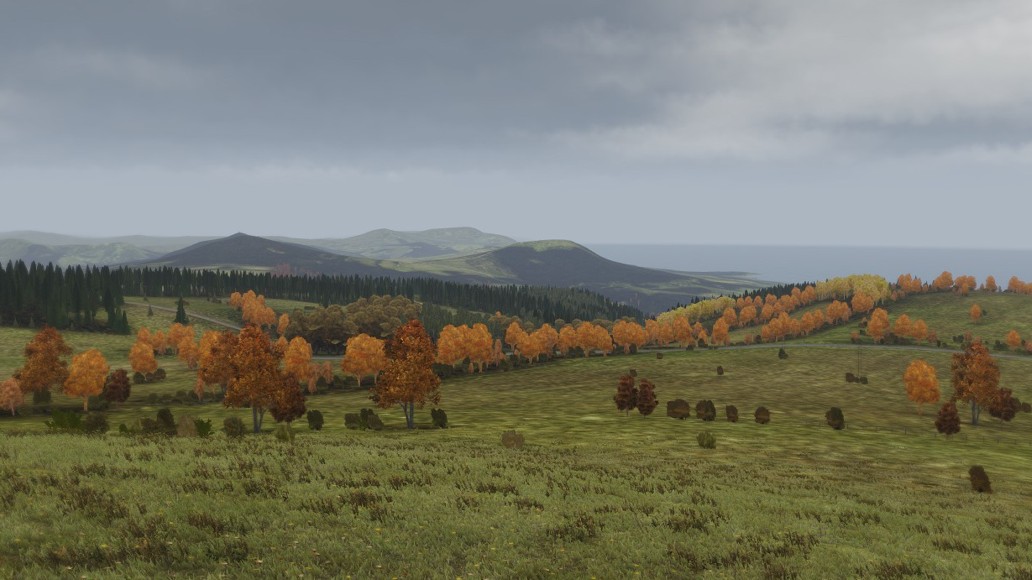
Chernarus is a fictional country introduced in the game Arma II, and the name of a large piece of terrain featured in the game spanning roughly 15x15 km. It was also the main location used in the DayZ mod which modified the game from a “military simulator” to a zombie survival game, which was later expanded1 into a standalone game where new details and towns were added to the original terrain (known as Chernarus+).
The map of Chernarus is closely based on an area in nothern Bohemia in Czechia, between Ústí nad Labem and Děčín and appears very similar to the real location, as many of the real buildings are also appearing in the game. Some people in the community would occasionally post pictures comparing the game with the real location either by Google Street View or from actual visits and note how familiar the place felt even though it was their first time there.
The map can be even be georeferenced and overlayed on the real location quite accurately:
A few years ago I was in the area and decided to put the map on my GPS handheld and try to use it as reference while hiking around the area for fun.
It took a bit of effort and learning for me to get it working, and in this post I will walk through how I did it. The same process can be used for any map sufficiently similar to a real location, be it other fictional, historical or rare maps that you might have a copy of.
Download and stitch high-resolution map from a tileserver
To obtain a high-resolution map of Chernarus, we are going to download tiles from a tileserver and stitch them together into one large map. A tileserver is a common way to serve maps for the web, where a large map is rendered as many small tiles, so we don’t have to load the full map. For this project I used the iZurvive Chernarus map as a source.
The address for the tileserver is
https://maps.izurvive.com/maps/CH-Mod/1.7.9/tiles/${z}/${x}/${y}.png
In this format ${z} is the zoom level, and ${x} and ${y} is the x and y integer tile coordinates, or simply the tile number.
Thus at zoom level z=6 (the highest of the server) the tile with x=4 and y=3 is found at https://maps.izurvive.com/maps/CH-Mod/1.7.9/tiles/6/4/3.png and looks like this
The whole map is split into pieces like this, and our goal is now to download all tiles for the Chernarus map and stitch them together. To download all the tiles, I used a shell script (modified from this question on GIS Stackexchange).
First we download the tiles:
# Extent of map
X1=0
X2=50
Y1=0
Y2=42

# Zoom level
Z=6

# Iterate through tiles and download
TILE_URL = https://maps.izurvive.com/maps/CH-Mod/1.7.9/tiles/${Z}/${x}/${y}.png
for x in `seq $X1 $X2`; do
    for y in `seq $Y1 $Y2`; do
        echo "Getting ${x},${y}"
        curl -s $TILE_URL -o ${Z}_${y}_${x}.png &
    done
    wait
done

echo "Rename .png to .jpg as files are wrongly named"
for i in ./${Z}_*.png ; do mv "$i" "${i/.png/.jpg}"; done
The images are actually JPEG files, despite the .png file extension, which is why they get renamed to .jpg file extension.
To stitch the images together I use montage from Imagemagick.
First we iterate through x coordinates and for each x we vertically stack all the relevant tiles from Y1 to Y2 together giving us a bunch of tall images2:
for ((x=0; x<=$X2; x++)); do
    echo "Stitching x=${x}"
    montage -mode concatenate -tile "1x" $(ls ${Z}_*_${x}.jpg | sort -Vr) out_z${Z}_x${x}.jpg
done
Finally we stack all of these images horizontally
echo "Stitching Everything together"
montage -mode concatenate -tile "x1" $(ls out_z${Z}_*.jpg | sort -V) full_map.jpg
If everything worked out, we now have a full map of Chernarus in high resolution on our hands!
Georeferencing Chernarus to real life
The next step is to overlay the Chernarus map on the real life counterpart by referencing some points on the game map with the same points on the real map. These are known as Ground Control Ppoints (GCP). To do this, I am using QGIS, a free and open source application for working with GIS (Geographical Information System) and the built in Georeferencer tool. Have a look at the QGIS documentation on Georeferencing for more details.
Adding other tilemaps to QGIS
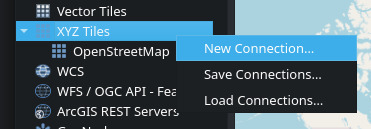
If you just installed QGIS you may want to add some more map sources, as only the standard Open Street Map tiles are provided by default. On the left panel, simply right click on “XYZ Tiles” and choose “New Connection”.
In the following dialogue you can add sources.
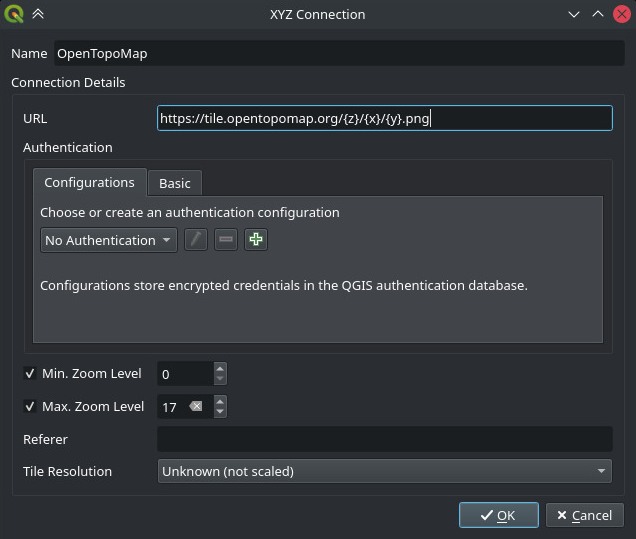
I like to use the OpenTopoMap for topographical maps athttps://tile.opentopomap.org/{z}/{x}/{y}.png, and Bing Aerial for satelite views at http://ecn.t3.tiles.virtualearth.net/tiles/a{q}.jpeg?g=1.
You can find more open tile servers here.
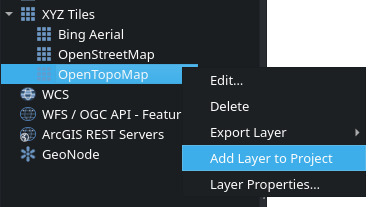
Now start a new project in QGIS and simply double click on the tilemaps you want to add them as a layer in the project.
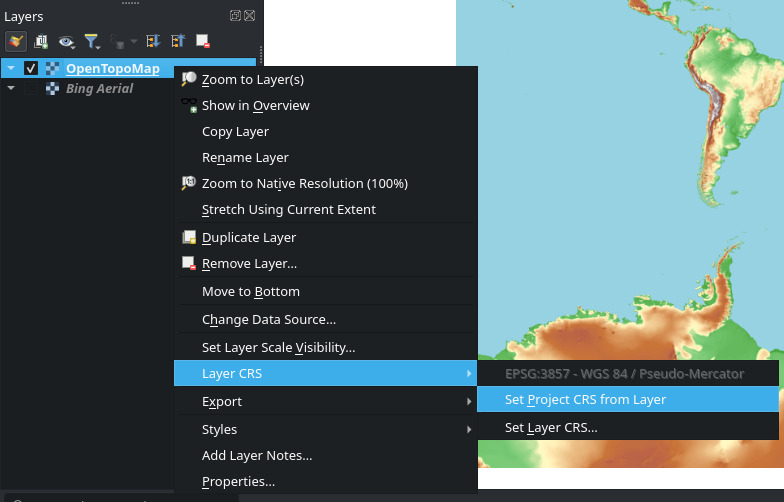
Since we are using a web map for reference we will set the Coordinate Reference System (CRS) of the project to the Web Mercator projection or EPSG: 3857 so it renders properly. QGIS automatically sets the project CRS to be the same as the first layer added, but yo be sure you can set it by right clicking on the OpenTopoMap layer, then “Layer CRS” -> “Set project CRS from layer”. This should set the project CRS to EPS 3857 - WGS 84 / Pseudo-Mercator.
NOTE: When we later transform the Chernarus map after georeferencing, it should be transformed into EPSG: 4326 if you want to use it on your Garmin device to show up properly.
Zoom in on Ústí nad Labem (in north western Czechia, north of Prague) in preparation for the next step.

Georeferencing points
In order to load the Chernarus map into QGIS we first convert it to a PNG3, e.g. with convert from Imagemagick. Or just load it into your favourite image editor and save as PNG.
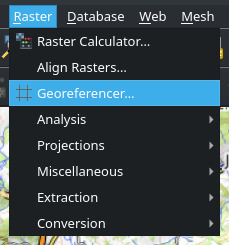
convert full_map.jpg chernarus.pngNow open the Georeferencer with Raster -> Georeferencer
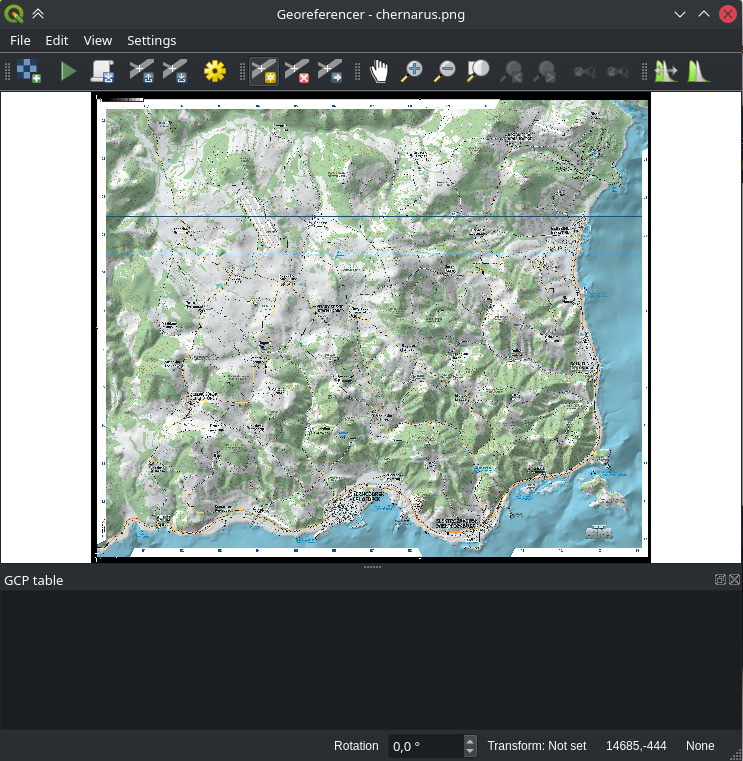
Load in the Chernaus map using Open raster (Ctrl+O), and it should look like this
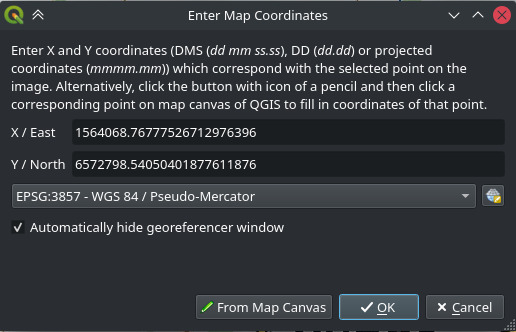
Now comes the fun part! We need to find points on the Chernarus map which are identifiable on the real map. Press “Add point” (or Ctrl + A) to add points, and then click somewhere on the Chernarus map that you can recognize in the real map. It will ask you to enter map coordinates - if you press “From map canvas” you can now click on the corresponding point on the real map, and the coordinates will be filled out.
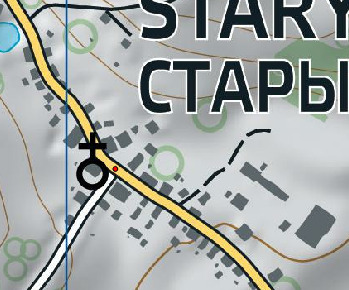
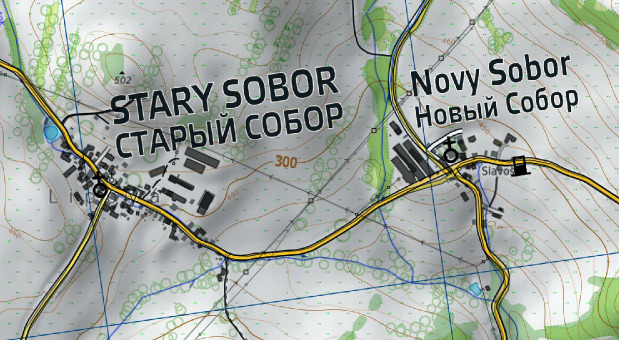
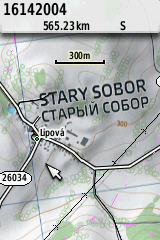
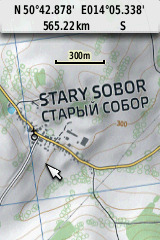
This could e.g. be the T-junction in Stary Sobor (Lipová)
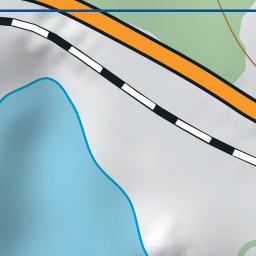
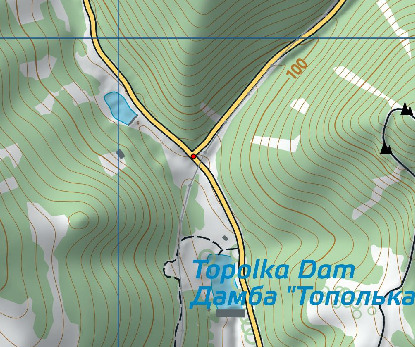
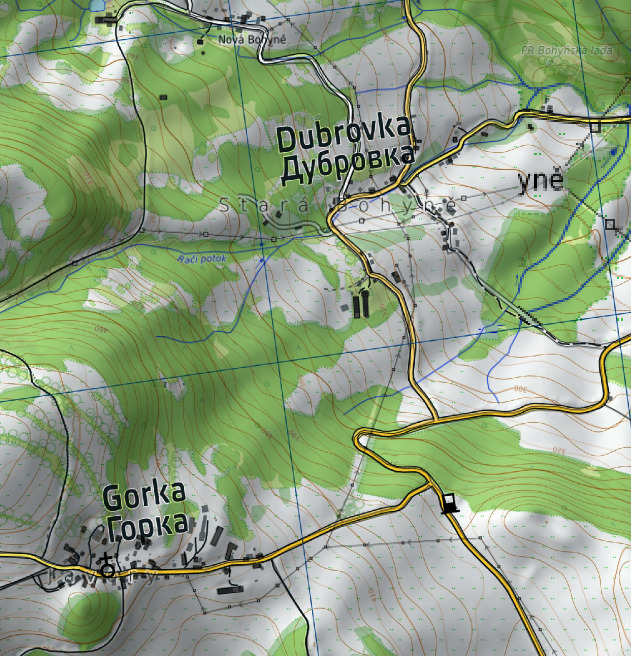
Or the roads meeting at Topolka dam (just north of Povrly)
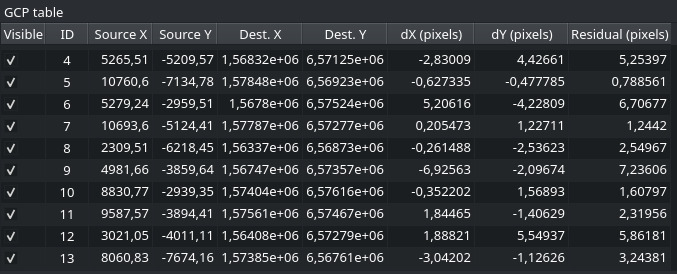
Keep going until you have at least four points, preferably more - I’ve used 10-15 points for a good fit, making sure to put points near the map edges as well.
Now open Transform Settings (yellow cogwheel) to set the parameters used for the georeferencing transform. After some experimenting I have chosen transformation type “Polynomial 2” and resampling method “Cubic” for the final transform, but feel free to see what works best for you. I suggest using “Nearest Neighbour” resampling to begin with, as it is the fastest so you can do adustments more easily.
If you want to use it on a Garmin device you should set “Target SRS” to EPSG:4326 - WGS 84 as this is the standard map projection used in these devices (and for GPS in general), unless you want to fiddle with your devices projection settings.
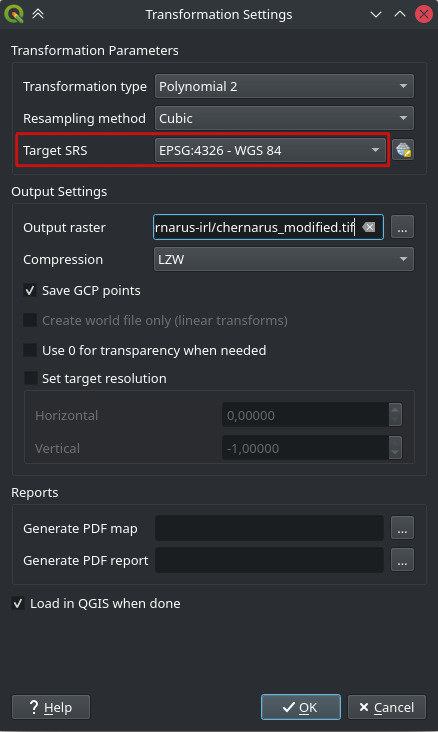
The Georeferencer documentation describes in more detail how the transformations work, and says the following about the Polynomial transforms:
The Polynomial algorithms 2-3 use more general 2nd or 3rd degree polynomials instead of just affine transformation. This allows them to account for curvature or other systematic warping of the image, for instance photographed maps with curving edges. At least 6 (respectively 10) GCP’s are required. Angles and local scale are not preserved or treated uniformly across the image. In particular, straight lines may become curved, and there may be significant distortion introduced at the edges or far from any GCPs arising from extrapolating the data-fitted polynomials too far.
If you check “Load in QGIS when done” the georeferenced Chernarus map will automatically be added as a new layer in the project when done. The file will also be saved as a GeoTIFF, here named chernarus_modified.tif, which is our georeferenced and transformed map.
Once the transformation parameters have been set, QGIS will calculate a residual for each point. When calculating a polynomial transform, there are some mathematical constraints which means a point on the raster may not end up exactly on top of the point you referenced on the real map after the transform. The residual essentially tells you how far off each point will land from its target. Thus if one point has a much higher residual than the rest (I aim for less than 10 px in this case), you may want to correct it.
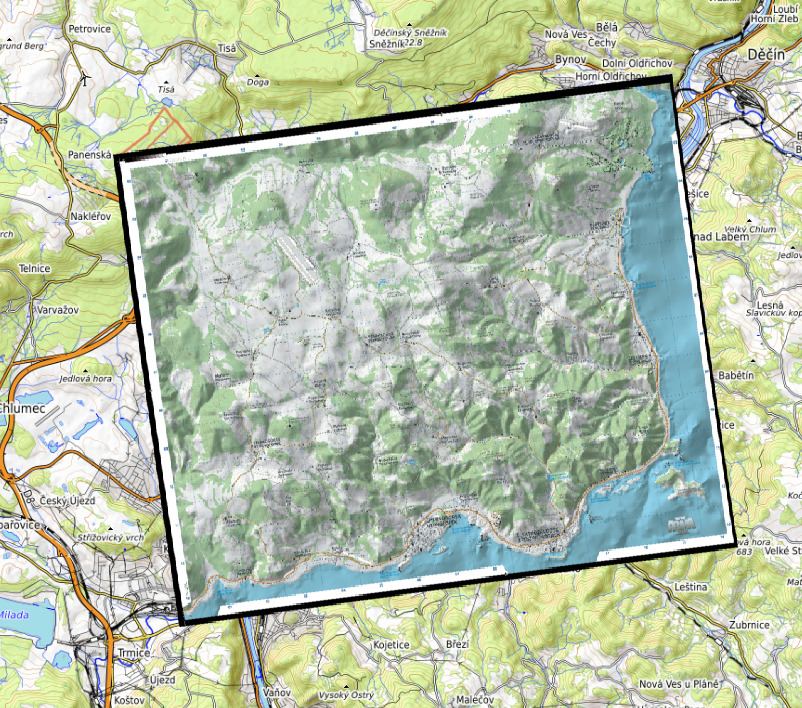
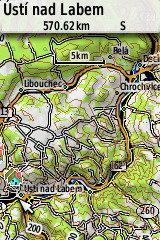
Now press “Start georeferencing” (green arrow or Ctrl + G) and wait for it to finish (takes about a minute on my laptop). If everything worked out, the Chernarus map should now be visible on top of the area around Ústí nad Labem
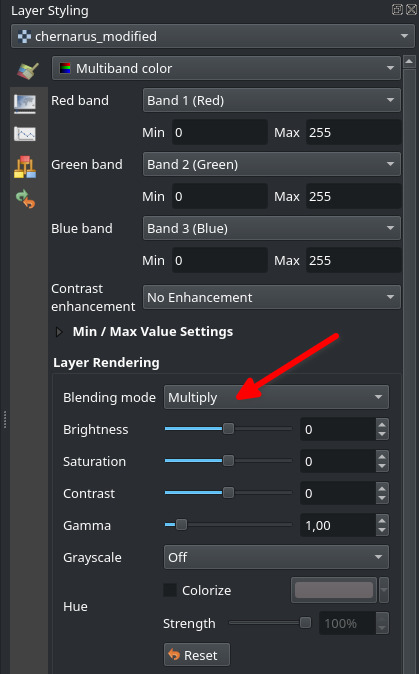
In order to see both the real map and Chernarus map at once, you can open the layer style panel (F7) and chose “Blending mode” “Multiply”.
While the fit will never be perfect, you should be able to see most roads fairly well aligned to the real life counterparts. Otherwise try adjusting the GCP points and transformation parameters
Add to handheld GPS (Garmin GPSMap)
If you have a Garmin GPS device you can add the georeferenced map if your device supports CustomMaps4. I’m using a GPSMap 64s, but the steps should be similar for other devices.
These devices don’t support GeoTIFFs directly, and we have to convert our newly made map into the Garmin CustomMap format. The format is a KMZ file, which uses raster map tiles with a KML file to keep track of their positions. This means we have to convert our image back into tiles! The difference is of course that we have adjusted the map and can specify proper coordinates for the tiles.
Installing GDAL
To convert the GeoTIFF I use the Python 3 script gdal2custommap5. You will need to install the GDAL library as well as the python bindings found in the GDAL package.
Linux: If you are running some variant of Debian/Ubuntu it can be installed system wide with sudo apt install python3-gdal, which will take care of the GDAL dependencies. If you are managing packages with e.g. pip you can use python -m pip install GDAL (assuming python points to python3).
Windows: Assuming you have a working Python 3 installation on your machine, you will need to install GDAL and the Python bindings manually. This can be done with binaries found at GISInternals. Have a look at the python GDAL package documentation for more details. After this, install the python GDAL package with Python Package manager of choice, e.g. Conda.
Convert to KMZ (CustomMap)
If we have a georeferenced map of Chernarus named chernarus_modified.tif we first convert it to tiles and an associated KML file with gdal2kml.py
python gdal2kml.py chernarus_modified.tif chernarus.kml
It is possible to specify some options such as JPEG quality (defaults to 75), KML draw order etc, which is detailed in the readme of the script. Next we use kml2kmz.py to zip up all the files into a single KMZ file
python kml2kmz.py chernarus.kml
Now you should have a chernarus.kmz which is ready to put on your device.
Add KMZ file to Garmin device
Connect to the device storage with e.g. USB cable and transfer chernarus.kmz onto the device under /Garmin/CustomMaps/chernarus.kmz. If your device supports an SD card you can use this to store the map, just put it under the same directory structure as the internal memory. This is recommended for transferring large files as the SD card tends to be much faster if used directly in a card reader instead of through the USB interface. Next, disconnect the device, insert the SD card if used, and reboot it.
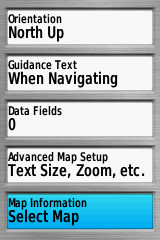
Now you need to enable the custom map to see it. For my GPSMap 64s i do the following: In the map view, press the MENU button, Setup Map and in the bottom under Map Information/Select Map, I can choose which maps to show.
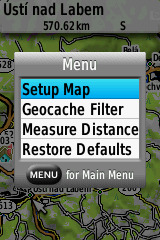
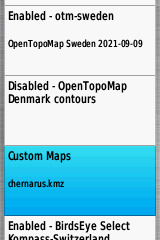
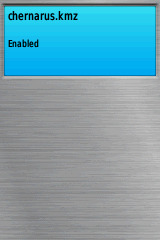
Find chernarus.kmz under Custom Maps and enable it.
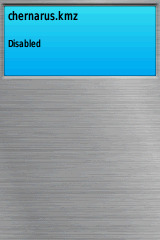
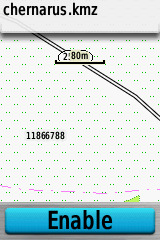
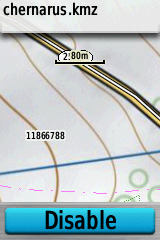
You can quickly check if it works by opening it again after enabling it, which should show a preview of the Chernarus map. If it doesn’t show up, try disabling other map layers as they might cover the custom map, and make sure the CRS of the GeoTIFF is set to EPSG:4326
If you haven’t already, find the area around Ústí nad Labem and Děčín and zoom in. You have to zoom quite close before the custom map renders, for me it shows only at the 500 m scale bar and closer.
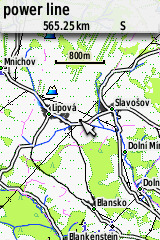
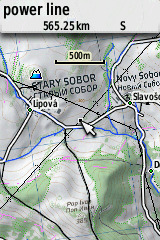
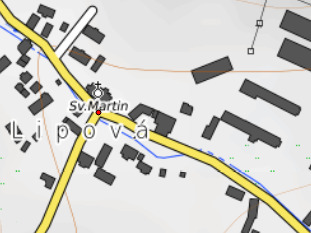
If you have other maps enabled, they might overlay or completely cover the Chernarus map. Here’s how it looks in Lipová with and without OpenTopoMap for Garmin enabled, where roads, town names and similar show as an overlay.
You can experiment with the --draw-order option for gdal2kml.py if you want to use overlays, as the KML order determines “height” of the layers, where layers with the lowest numbers are drawn on the top.
Visit to North Bohemia
The final step is of course to travel to the area in real life! Ústí can be reached by direct train from Prague in 70 minutes for 5-7 € (tickets from oneticket.cz or directly from České dráhy, the national rail service), and there are plenty of places to stay overnight in the area - I can warmly recommmend the combined hotel-brewery Na Rychtě both for eating at their restaurant or for staying a few nights in Ústí.
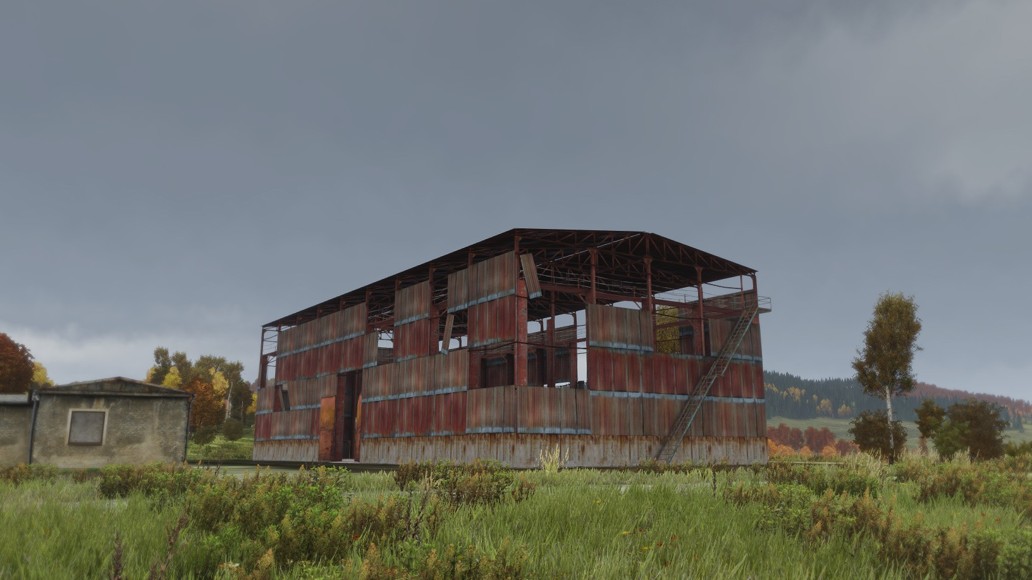
If you have played just a bit of Arma or Dayz in Chernaus, you will find the place quite familiar as you walk around, as the developers have included not just the road network but also several buildings in the game, as shown in this imgur album. Below are a couple of the pictures I took myself
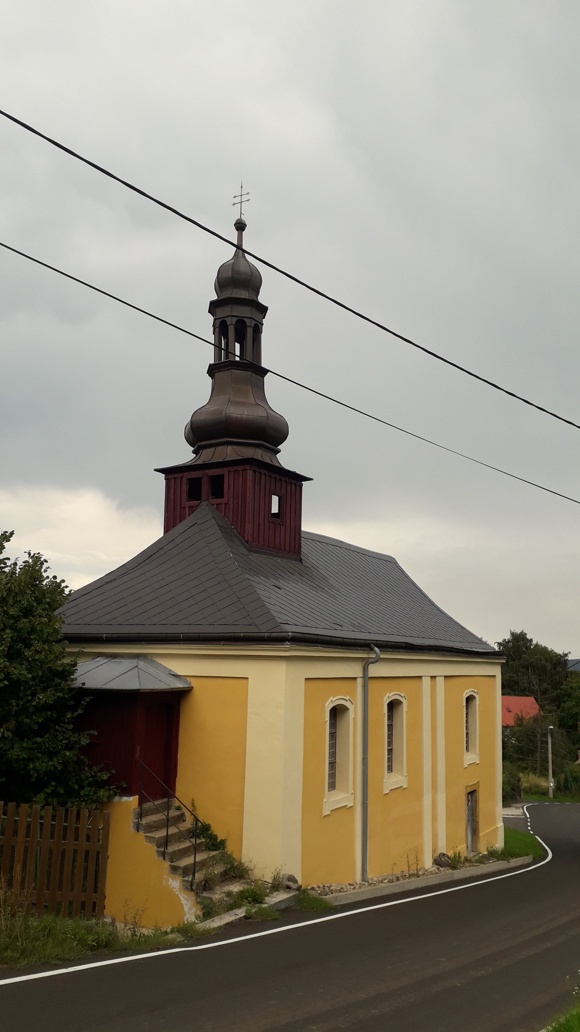
 Characteristic yellow church in Javory (“Gorka”).
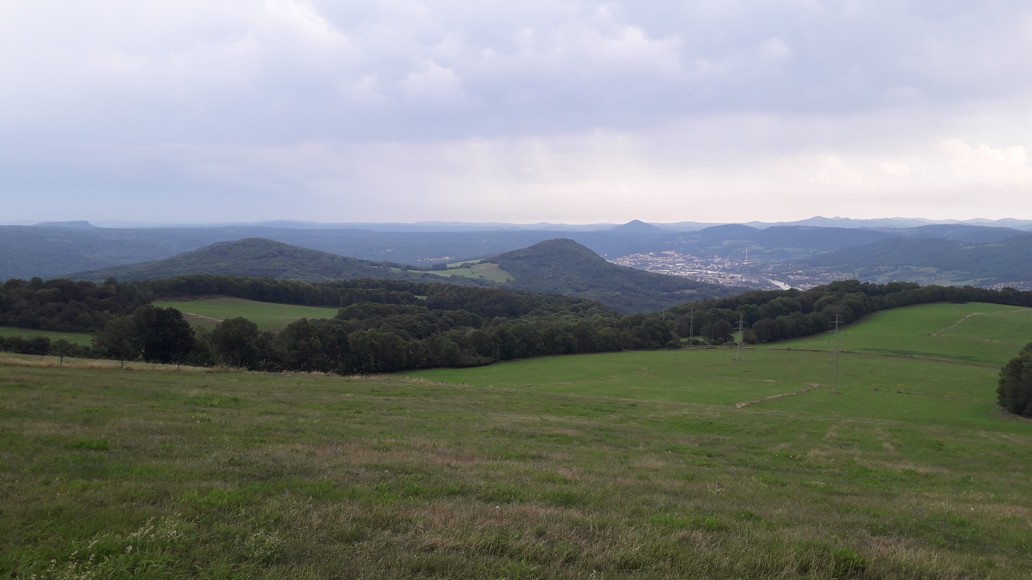
 View from Javorský vrch (“Altar”) to Děčín (“Berezino”).
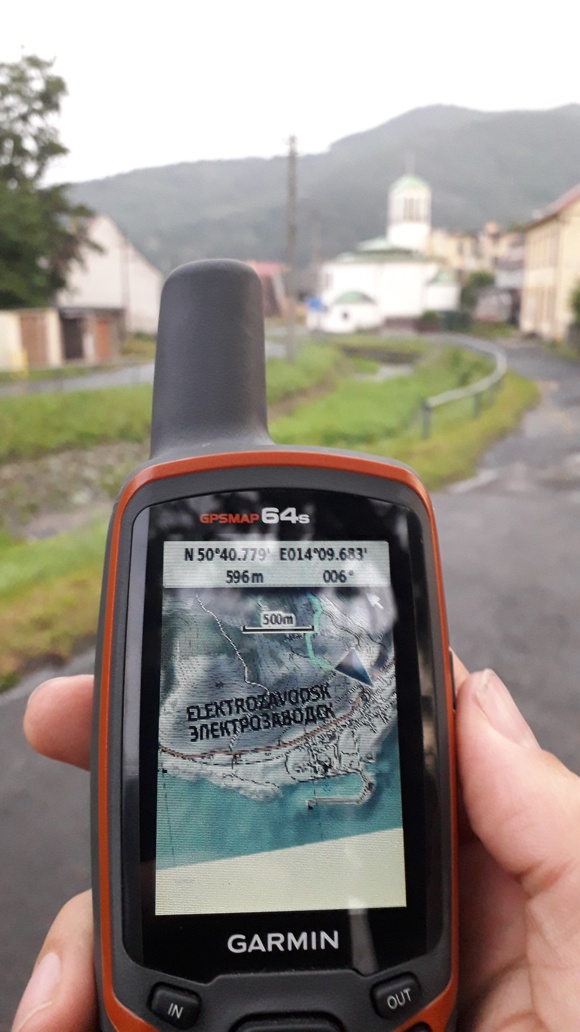
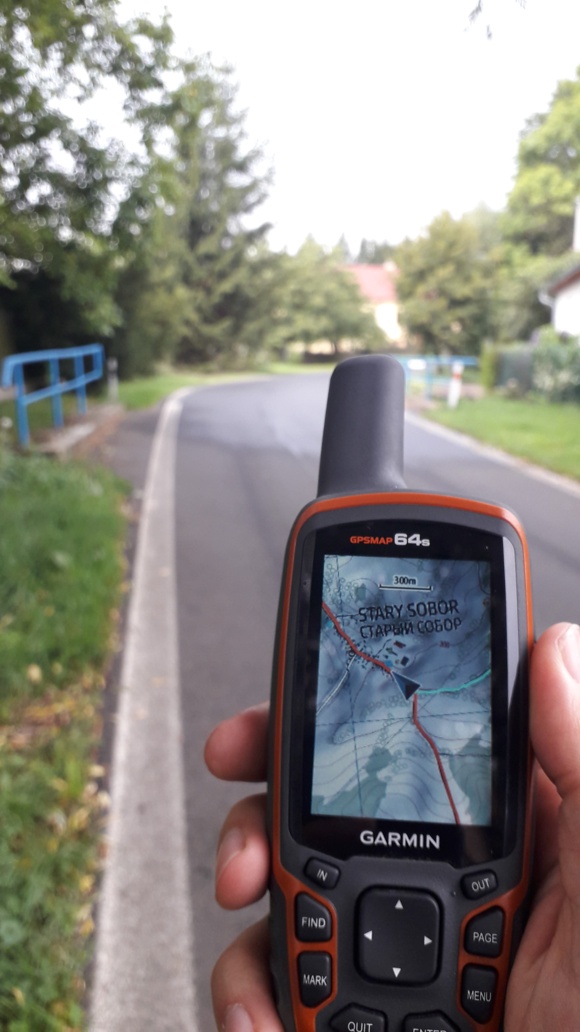 View of GPS when entering Lipová (“Stary Sobor”).
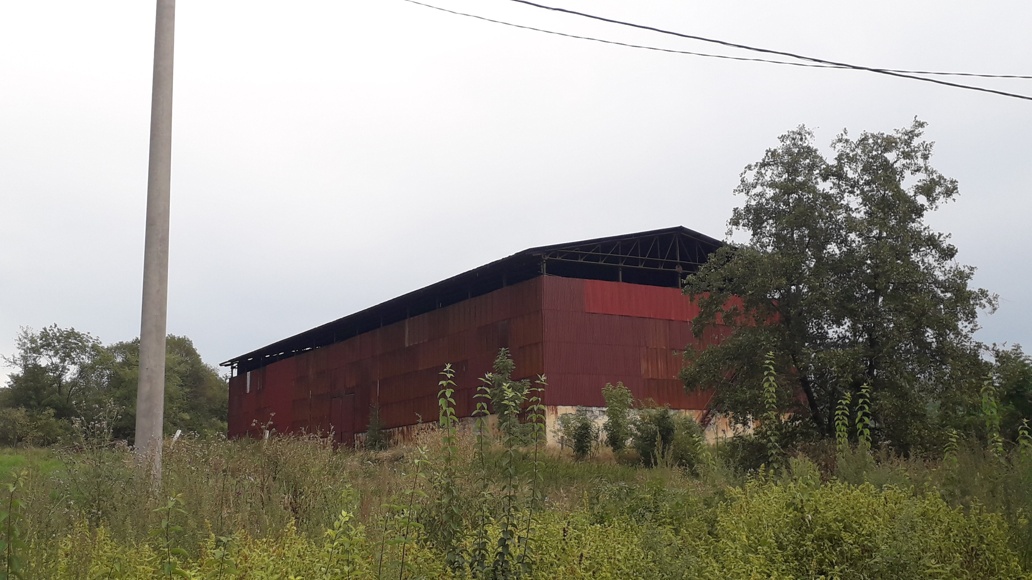
 The infamous red metal barn in Lipová (“Stary Sobor”). It seems to have been repaired when comparing to older pictures.
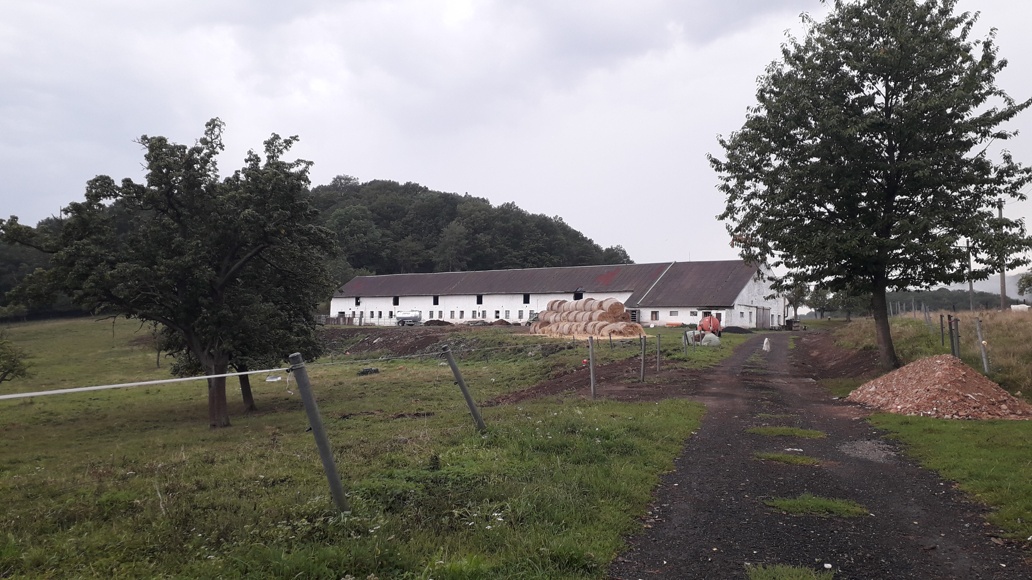
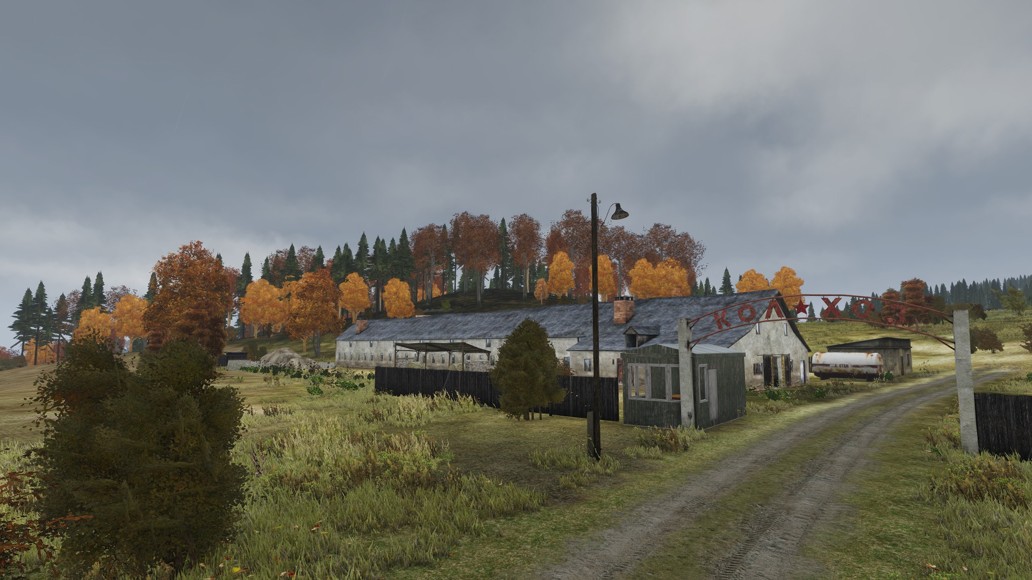 A farm building in Český Bukov (“Staroye”) used several places in the game.
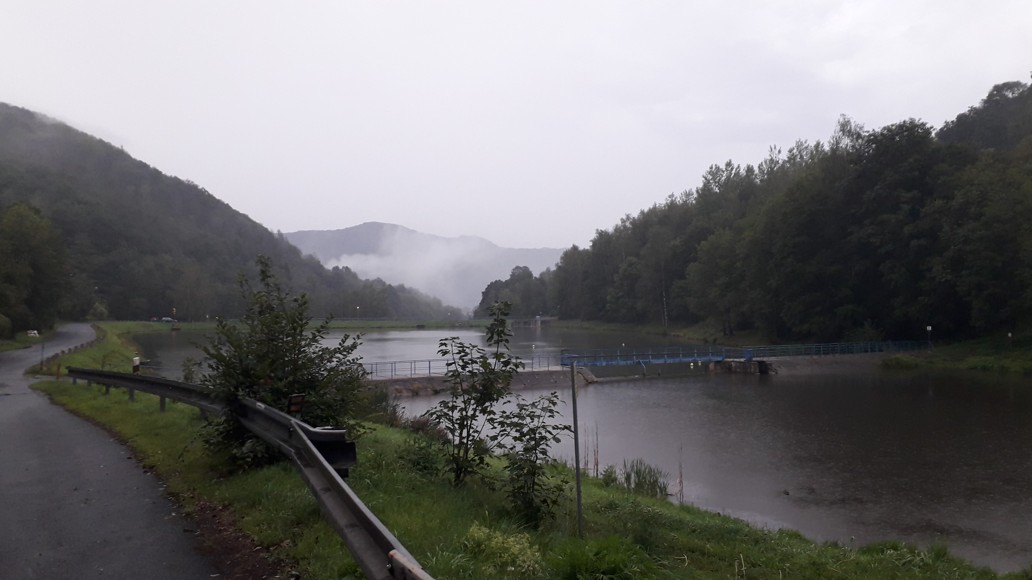
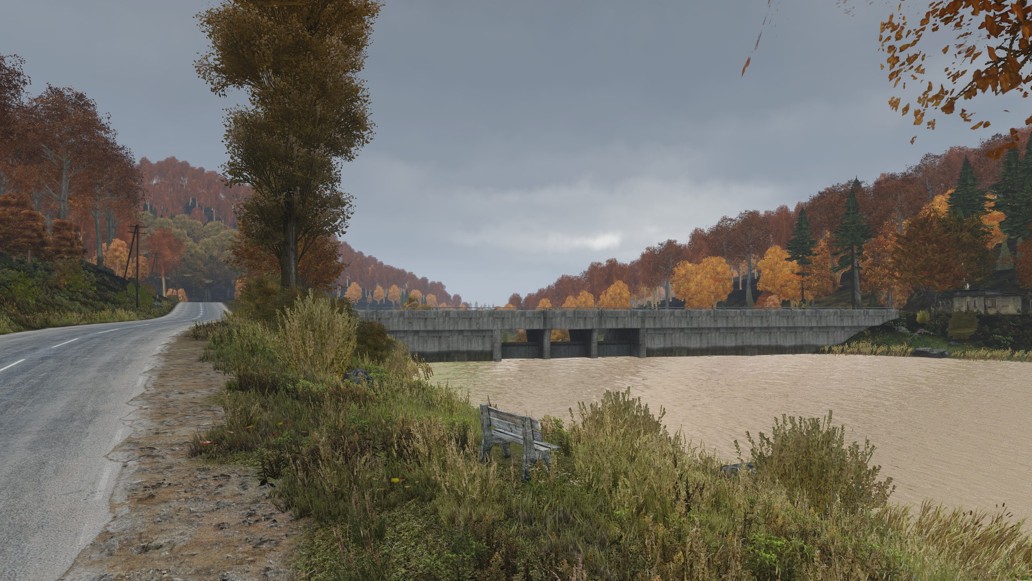 View towards south of dam near Povrly (“Topolka Dam” north of “Elektrozavodsk”).
Summary
In this post we have obtained a high-resolution raster map from a tileserver, georeferenced it in QGIS to the real world location it is based on, and then converted it to a Garmin compatible KMZ file for viewing on a handheld GPS device.
You can also grab the Chernarus KMZ file directly to put on your device and save some time.
The methods shown here can be applied to any map which is sufficiently similar to real world locations - It could be interesting to walk around your town using a historical map to get a sense of how things used to look, and how much it changed since the map was made, for example.
-
DayZ standalone had quite a turbulent development history, being stuck in a paid “early alpha” pre-release stage for five years from 2013 until its official release in December 2018, but that’s a story for another time… ↩
-
Ideally
montagecan stitch all the images together in one command, but I had issues withtoo many open fileserrors on my system when trying to stack them all, which is why it is split in two sections. ↩ -
QGIS does support loading of JPEG raster images, but I encounter whenever I try:
not a supported raster data source. (libjpeg: Wrong JPEG library version: library is 62, caller expects 80), which is why I convert to PNG. I didn’t find a solution, let me know if you can get it to work! ↩ -
There’s a list of supported Garmin devices on this support page in footnote 1, “Click Here for a List of Compatible Devices”. ↩
-
This is a fork of the Python 2
gdal2custommapscripts by Tris Forster, which I modified slightly to wok with Python 3 and iron out some bugs. ↩